I have been asked numerous times over the last 3.5 years what I do to manage my curls. Every time I respond, “The Curly Girl Method!” 9 times out of 10, people look at me cockeyed and request an explanation. So, finally, after multiple friends and strangers prompting me to type out this post, I am finally getting off my lazy rear and doing it.
So, here it is. The Curly Girl Method… my way.
OVERVIEW
Using Lorraine Massey’s “The Curly Girl Method” is life-changing. Not literally, well kind of, in that it helps you love, instead of loathe and perpetually battle, your natural hair texture. You can Google “Curly Girl Method” for real specifics, but these are the basics in my arsenal:
1. Co-wash only. Wash with certain conditioner, not shampoo, as curly and wavy hair require more moisture than straight hair.
2. Use only water soluble products. Anything with silicone, parabens, any ingredients that end in “-cone”, “-xane”, or “-zane” is a solid no because it will not wash out with conditioner and will damage your hair.
3. Do not screw with your natural curl/wave pattern. Do not brush it and do not use hot tools on hair, as this disrupts the hair’s natural texture. You’ll be amazed how much easier it is to style and how much nicer the curl/wave pattern is when your hair is healthy and finally understands what you want it to do. Straight one day, wavy another, curly the next… that would give me an identity crisis too! Let your hair do its thing and see how happy it is.
Once you get used to it, this is a super easy, cheap, and sustainable process. It’s great for kids as conditioner doesn’t sting your eyes!

STEP 1
Before you start this method, you MUST wash out all of the previous products that have barnacle’d themselves onto your strands. This is called a “final wash.” (If you ever get a salon haircut that is not a Deva cut, or inadvertently use products that aren’t Curly Girl friendly, you will need to do a “final wash” again, then resume usual Curly Girl habits.) To do this, you can use baby shampoo, Suave Essentials Shampoo, or even dish soap. Condition WELL with Curly Girl friendly conditioner (like: Suave Essentials or DevaCurl One Condition), and style as noted below.
MAINTENANCE
A cheap and readily available Curly Girl friendly conditioner is Suave Essentials (Ocean Breeze is good, the Coconut is ok but any coconut-based product can overload your hair with protein which can lead to dry, tangle-prone hair. If you get a protein overload, wet hair in the shower, pour on a cup or two of apple cider vinegar directly on the roots, scrub, rinse, then condition with a less protein-heavy conditioner.) For a nicer cleansing product, I recommend DevaCurl One Condition, which you can find at Ulta in big containers. You can use DevaCurl No Poo (NOT the Low Poo varierty) too if you need a little extra scalp cleansing.
Washing: Simply wet hair in the shower, cleanse with conditioner (scrubbing the scalp with finger pads and washing down the length of the strands) like you would if thoroughly shampooing. Comb through (this is the only time you detangle… NEVER brush/comb dry hair) with a wide-toothed comb.
Rinsing: Rinsing upside down is awesome, as it keeps some conditioner on the outer layer of hair, which is the area that gets the most weathered by the elements. But, rinsing normally is fine too. If hair needs a little more moisture, finger-comb some conditioner from mid-strand to ends, let it set while you shower, then rinse.
Drying: Use an old t-shirt to dry hair (no roughing up the hair… just blot or twist into a turban.) Apply a small amount of Curly Girl friendly leave-in conditioner (Kinky Curly Knot Today is available at Target and most drugstores) to damp hair.
Pre-styling: In still-damp hair, create your desired part. Finger-define (twirl around your finger AWAY from the face) the top section of hair and any face-framing pieces. And let air dry overnight, if headed to bed, or move to styling.
STYLING
There’s a quick method (best for everyday and for kids) and a longer – but definitely worthwhile for a good hair day – method. It all depends on your time, patience, and give-a-crap level that day.
The Quick Styling Method
1. Start with damp hair. If hair isn’t freshly co-washed, spray to wet it (fill a plastic spray bottle with water, add a dollop of your conditioner, a smaller dollop of gel – like Miss Jessie’s Jelly Soft Curls –, and *optional* a couple of drops of avocado oil. Shake it up to mix, spritz hair, keep it in your bathroom, and now you have what is called a “refresh spray.”)
2. Create your desired hair part, if not already done.
3. Section hair into 2-3 horizontal sections, clipping each away separately (metal or plastic alligator clips work great for this and can be found almost anywhere.)
4. Add a golf ball size dollop of Curly Girl friendly mousse (Herbal Essences Totally Twisted Mousse is widely available) to your hands and rake it through the bottom section. Then, finger-define (twirl) 1″ wide sections of hair. Unclip the next section and repeat the process. Always twirl AWAY from the face, as this is most flattering. Really focus on giving definition, by way of twirling, the top and face-framing pieces.
5. Air dry.
The Long Styling Method
1. Repeat steps 1 and 2 of The Quick Styling Method.
2. Section hair into 3-5 horizontal sections, clipping each away.
3. Add a golf ball size dollop of Curly Girl friendly mousse (such as Herbal Essences Totally Twisted Mousse or John Frieda’s Curl Reviver Mousse) to your hands, work it from mid-strand to ends then work any remaining product up toward the roots. Finger Define (twirl) small (1/4”) wide sections of hair. ALWAYS twirling away from the face.
4. Repeat this process until each section is mousse’d and twirled.
5. Use alligator clips to pin-curl face-framing and top layer curls (this gives them extra hold.)
6. Plug in your hair dryer with a diffuser attachment. Set it to low/medium and the lowest heat setting, then dry the hair. Move the hair by moving your head around to give the style movement and volume (there are loads of YouTube videos that offer tutorials on this.) Be sure to focus on drying your roots, so you don’t wind up with dry ends and soggy roots… yuck!
7. Stop diffusing when hair is 70-80% dry.
8. Air dry.
9. Once hair is ENTIRELY dry, remove clips.
10. Gently scrunch any crunchy curls to release the product cast, and finger define any errant curls. Reset any stubborn curls with alligator clips in pin curls if needed. Then do. Not. Touch. Just leave your hair alone. Otherwise: frizz. Plus, it can take 30 minutes after styling for hair to settle and actually find its form. I am still frequently surprised by the transformation that can take place post-styling. So don’t freak out if your hair looks flat/poofy/less curly than usual right after all that effort. Give it a moment… just don’t touch!
Styling for Volume
If you’re like me and have finer hair, you’ll want to give a little lift to your roots. Here’s how.
1. Follow all of the steps in either The Quick Styling Method or The Long Styling Method. Once hair is entirely dry, shimy your fingers (palms facing towards your neck, fingers straight and spread apart, fingertips pointing upward towards the sky) up along the very bottom of your scalp and kind of fluff just the bottom layer with your fingers. Only pull the fingers an inch or two away from the scalp so as not to disturb the curl pattern. Now, get your hands out of there!
2. Flip your head over and shake your curls. You may lightly place your palm on your scalp with your fingers wide and lift up a half inch or so for volume on top, but this is dicey, especially if you’re frizz-prone. Skip it if you can’t risk frizz. Then flip your head back up and gingerly fix any errant curls with your fingers by finger-defining.
3. Next, and this step is vital: do NOT touch. Just don’t. Accept your curly fate. Worst case, twirl a couple of stubborn front pieces back and secure with bobbypins for a half-up ‘do.

TIPS
– If you really like a good scrub, want extra oomph at the roots, or don’t have strong hand muscles, this little scalp scrubber is great to use when washing hair.
– Use a satin pillowcase. If you’re traveling without your pillow, wear a satin hair bonnet (you can get it at Target, some pharmacies, or a beauty supply store.) This will minimize frizz and increase the amount of time you can go between washing and restyling.
– If opting for a ponytail/bun/updo, spray the front of the hair with water or the refresh spray before combing with fingers or the wide-toothed comb. (Though it’s not really approved by the Curly Girl Method, a Tangle Teaser brush can help get the front bits neat if you need a sleeker look, but always spray hair with water or the refresh spray before using.)
– Standard hair ties aren’t great for curly or wavy hair. Invisibobble hair ties are much kinder. Plus, they make thin-hair updos appear a bit fuller, and they hold hair up securely without the standard discomfort at the roots that traditional hair ties cause.
– Sea water and pool water do not require any special adjustment to the routine. Simply co-wash as usual.
MY TWO CENTS
I share alllllll of this not to convert you, but to offer an option. Especially for those of you who, like I did for years prior to adopting this process, loath and struggle with their hair. Or for so many of you who grapple with how to manage your child’s differently textured hair.
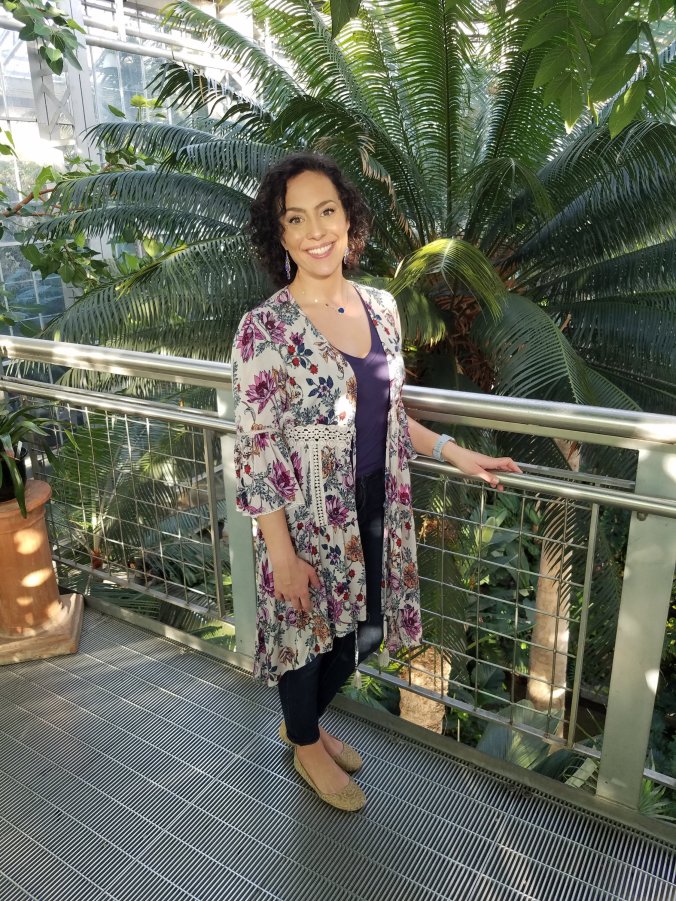
I think I can firmly state that there has been a monumental shift in not just my hair’s health and texture, but in my perception and acceptance of my hair, which has boosted my self-esteem and self-confidence beautifully. We all deserve to love our hair.

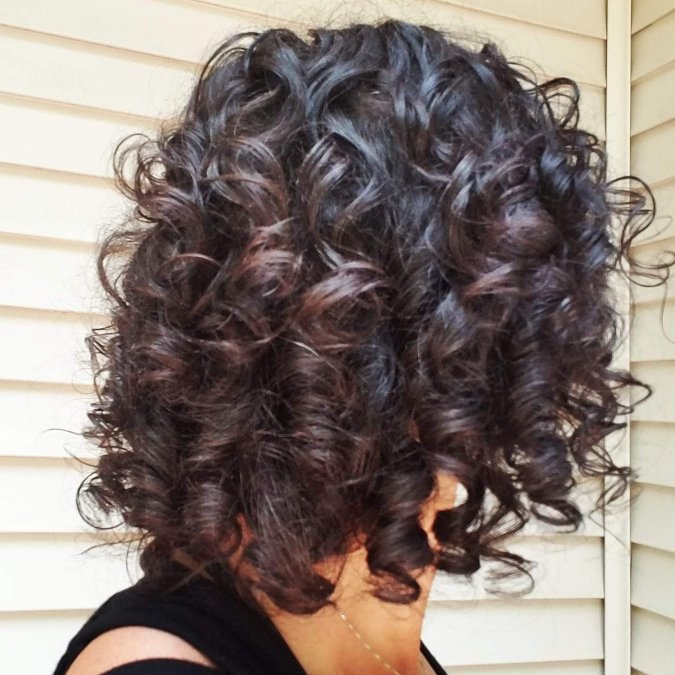
Before starting Curly Girl vs 3yr After using Curly Girl
